WORLD Best WebSite for Solve your Computer Problems, Download Free Register Software & Games, Mobile Application, Watch Live TV Channels, Make Money Online, Learn Complete Computer Softwares and Computer Tips in Urdu n English Language.

Monday, 15 April 2013

Let,s How to Add a Custom Search Gadget to Blogger


Today have a two part tutorial on how to add a custom search gadget to blogger. The title should almost be a SIMPLE Custom Search Gadget for Blogger. It really is that easy to add and customize.

Having a search feature on you blog can save readers a bunch of time if they are looking for something specific or a certain topic. Plus, like I said earlier, adding one is so incredibly easy that there isn't a reason in the world you shouldn't have one; and you'll wonder why it took you so long to add it.

The easiest way to add search function is to add the blogger team designed gadget "search box".  It's a fine option if you wish to have a generic look to the search box. It says it's a custom google search but that just means you can add different variables to search; for instance you could have it search not only your blog, but google, and your blog roll. That seems to be all the customization available.

And it would look something like this.

 SEARCh

Doesn't inspire too much creativity does it. After all you've spent countless hours
 making your blog look the way you want it to look. A generic search function just stands
 out and doesn't blend with the look and feel of your custom blog design. Wouldn't you rather it look something like this?


or this?

or maybe even this?


So here we go How to Add a Custom Search Gadget to Blogger

First things first lets add the search box to your page and then we'll discuss a few quick changes.

1. Go to Dashboard > Design > Page Elements > and select "Add a gadget" > then click the plus sign 
(looks like this   ) next to the HTML/Javascript.

2. Copy and paste the following code to the content box.

<form action="/search" id="searchthis" method="get" 
style="display: inline;">
<input id="search-box" name="q" size="30" type="text" /> 
<input id="search-btn" type="submit" value="Search" /></form>
3. Save and Viola, you are done.

Now lets show you some quick ways to customize the search function.

Add words to the search box.  Currently the box is blank. add the following code value="keyword 
search" right after the code type="text" but before the />. You can change the text inside the 
quotes to whatever you want. For example you could have it say "search" "search loving life" or 
"enter keyword". It's whatever floats your boat, it's your search function. 

Change the word in the enter button. This is easy! Find the code value="search" and again 
change the text inside the quotes to whatever you want. For example it could say "go" or "find".
 Seriously whatever. 

Change the width of the search box. lets say that you want this in your sidebar but it's too long.
 Find the codesize="30" and adjust the number up or down. A larger number will make a longer
 search box, a smaller number will make a shorter text box. Play around with the number to find the right feel. 

I think that is all for now. Next post I'll show you how to change the background 
color, the border, the text and switch the search button to a picture. 

If you are having trouble with the search function or have a question leave a 
comment or email us and we will see what we can do.
IF YOU Like This Post Then PLs Sahre this Post to your Freinds

Saturday, 13 April 2013

New Blogger HTML Editor And Top New Features


New Blogger HTML Editor

Just found which I have heard from the ProBloggers in their Blogs, that Blogger Team working very hard on the betterment for Blogspot display place. So I am going to share with you a great news that Google has just introduce New Blogger Template HTML Editor with great features. Before you have a simple Template HTML Editor, but now Blogger has added such useful tools there for making it more users friendly. 

\

Usage of New Blogger HTML Template Editor

There is nothing to take tension for its using its very simple. I will try to guide my visitors every part of new Blogger HTML Template Editor. You can easily use it> Go to Blogger Dashboard > Template > Edit in HTML > 
Backup Your Blogger Template first before any editing 


New Blogger HTML Editor

Jump to widget Button


Blogger Jump to Widget

You can simply jump to any widget without wasting your time for search and then simply edit it as per your requirement. It will show you complete gadgets which are installed in your Blog as well as Blogger Builin Gadget such as Blog1 or Navebar. 

Preview Template

Before whenever you edit anything HTML you have and you asking for preview it was shown in a new window, but now it has been upgraded with new awesome feature, which can show preview in below there it means you don’t have to go in new window. 

Format Template

In previous version of HTML there was a check box for Expand Widget Template but now it has been replace with Format Template option. So now if you find for Check Box on Expand Widget Template in any tutorial then you have to click on “Format Template” 

Line Number for Finding any Error

Before if we edit any thing in HTML and if we have mistake anywhere its shows that we have not closed any code or something else in the line No. but in new interface we don’t have to worry about that I have introduce line number for getting exact location of error. 

Expand Hide Code Section

It has also introduced another facility for hide and expanding codes of difference section. It means if you are working in HTML you can hide contents which are not in use.
New Features
  1. Is a new feature in blogger that highlight the style, ID, class, tags etc with different color which is not available in old template HTML editor. So you can easily apprehend the different tags and more.
  2. Line Numbering : It's another feature that add numbers to the each lines. Its pretty new feature to help where is error. You might have seen many times error while editing template like error in 4384 line. In old editor its difficult to find line which error happens in codding, so now its easy to find.
  3. Auto-Indentation : This is new option allow you to clean up the indentation of template automatically by clicking Format template button.
  4. Code Folding : You can see black right arrow on the left line numbering panel on the HTML editor. Which fold all code under a widget (it's block of  inside code of a widget). So while editing the inner code of a widget in HTML editor you should unfold or expand it. Its cool pretty.

How to Disable Right Click on Blogger Blogs?


We recently faced many probelems regarding our content copyrights, every day our content is copied by newbie bloggers. To overcome these everydays issues, I've decided to take some major actions. When you find someone violating your copyrights then the first thing is to do; report that blog to Google instantly, And Google helps faster regarding this. However, you may also take some measures in order to protect your content from copycats. And one of the measures is to disable right click on your blog. By doing this, no one will be able to right click on any image or any other icon available on your blog. When someone will right click, a pop up will be shown with an error message. This is very useful for those who want to protect their images and icons etc from being copied by others. However, visitors can still select your text/articles and can copy by using their keyboards' short cut keys. Tomorrow we'll overcome that issue as well. 

How to Disable right click on your blog? 

Now let's start disabling right click in blogger blogs, this is very very easy process and you'll just have to add a peice of JavaScript code, which will prevent visitors from right click on your blog. Follow given steps:
  1. Go to Blogger 
  2. Layout >> Add a Gadget >> Select HTML/JavaScript Widget
  3. Now copy below code and paste inside HTML/JavaScript
<script language=JavaScript>
<!--
var message="Right Click is disbaled!";
function clickIE4(){
if (event.button==2){
alert(message);
return false;
}
}
function clickNS4(e){
if (document.layers||document.getElementById&&!document.all){
if (e.which==2||e.which==3){
alert(message);
return false;
}
}
}
if (document.layers){
document.captureEvents(Event.MOUSEDOWN);
document.onmousedown=clickNS4;
}
else if (document.all&&!document.getElementById){
document.onmousedown=clickIE4;
}
document.oncontextmenu=new Function("alert(message);return false")
// -->
</script>
4. Save the widget and view your blog, and right click somewhere on your blog and you'll see a pop up box saying "Right Click is Disbaled".

This was an easy to use code which will disable right click on your blog and will also protect your images and icons from being copied by others. But for protecting your articles and text you may wait till tomorrow.

Take Care and please don't copy content from other websites/blogs instead write your own, write less but your own, you can only get respect when you try to write and create everything by yourself, copying from other sources can only hurt you. Thanks

10 Most amzaing Windows 8 Tips


Top 10 Windows 8 tips and tricks

Customize your tiles
Windows 8 tilesMake the most of your Windows Start screen tiles by adjusting the sizes, where they are located, and what is listed.
  • Move any tile by clicking and dragging the tile. While moving a tile, if you need a larger view of the Start screen move the tile towards the top or bottom of the screen to zoom out.
  • Use your mouse wheel to scroll left-to-right through your tiles.
  • Any Desktop shortcut or program can be pinned to the Start screen by right-clicking the icon and choosing Pin to Start.
  • In the bottom right-hand corner of the start screen is a magnifying glass with tiles, click this icon to get a zoomed out view of your Start screen. In this view, if you right-click on a group of tiles you'll be given the option to name group, which can be useful if you have a group of related tiles (e.g. games). In this view, you can also click and drag a group to organize your tile groups.
  • Create a new speed bump between tile groups by moving a tile to a speed bump.
  • Resize any User tile or Live tile by right-clicking the tile and choosing resize.
  • If there is a tile you want on your Taskbar, right-click the tile and choose Pin to taskbar.
  • Show admin applications on the Start screen by clicking Settings in Charms, click Settings, and change the Show administrative tools from No to Yes.
  • In Internet Explorer 10, you can also pin any of your favorite web pages to your Start Screen.
Windows 8 keyboard shortcuts
Knowing at least some of the Windows 8 keyboard shortcuts will make your Windows 8 experience much more enjoyable. Try to memorize these top Windows 8 shortcut keys.
  • Press the Windows key to open the Start screen or switch to theDesktop (if open).
  • Press the Windows key + D will open the Windows Desktop.
  • Press the Windows key + . to pin and unpin Windows apps on the side of the screen.
  • Press the Windows key + X to open the power user menu, which gives you access to many of the features most power users would want (e.g. Device Manager and Command Prompt).
  • Press the Windows key + C to open the Charms.
  • Press the Windows key + I to open the Settings, which is the same Settings found in Charms.
  • Press and hold the Windows key + Tab to show open apps.
  • Press the Windows key + Print screen to create a screen shot, which is automatically saved into your My Pictures folder.
See our Windows shortcuts page for a full listing of all Windows shortcuts.
Know your hot corners
The corners on your screen are hot corners and give you access to different Windows features. Below, is a brief explanation of each of these corners.
Bottom Left-hand corner
The bottom left-hand hot corner of the screen will allow you to access the Start screen, if you're in the Start screen and have the Desktop open, this corner will open the Desktop from the Start screen.
Tip: Right-clicking in the left hand corner will open the power user menu.
Top-left corner of the screen
Moving the mouse to the top-left corner and then down will display all the apps running on the computer. Clicking and dragging any of these apps to the left or right-hand side of the screen will snap that app to that side of the screen. Each of these open app icons can also be right-clicked to close or snap.
Right-hand side of the screen
On the full right-hand side of the screen will be given access to the Windows Charms.
Taking advantage of search
The Search in Windows 8 has been significantly improved when compared to all previous versions of Windows. To search for a file or run a program in Windows 8 from the Start screen just start typing what you're trying to find or want to run.
As you begin typing, the results will start appearing on the left-hand side. In addition to being able to search for files and run programs, the Search also supports limiting the search to apps such as Finance, People, Maps, Photos, Mail, Music, Videos, Weather, and much more. If what you are searching for is not a file or program, click on the app you wish to use as the search. For example, if you were searching for "New York" and selected the Weather App you would be shown the weather in New York, NY.
By default, Search organizes the available Apps by how frequently they are used and then in alphabetical order. If you want to keep your favorite app at the top of the Search list, right-click the app and choose Pin. Pinning the app will lock it in place regardless of how often it is used. If there is an app you don't want (e.g. Finance) you can turn on and off any of the search apps through the PC settings, which is found under the Settings in the Charms.
Bonus tip: The Search is also found through Charms and can also be opened by pressing Windows key + F.
Running two apps side by side
Any app can be pinned to the left or right-hand side of the screen. For example, open the People app and then press the Windows Key + . (period) to move that app to the right-hand side of the screen, pressing the same keys again will move it to the left-hand side, and pressing the same keys again will make it full screen. While an app is pinned, any other app or program can be opened and loaded into the available space on the screen. For example, in the below picture, we've opened a browser window and have the People app running to monitor our social networks.
Windows 8 People
Any open app can also be pinned using your mouse by clicking at the top of the tile and dragging it to the left or right-hand side of the screen.
Bonus tip: The Desktop can also be pinned to the left or right-hand side of the screen.
Note: In order for snap to work properly your resolution must be at least 1,366 x 768.
Windows 8 Task Manager
The Windows 8 Task Manager has been significantly improved over previous versions of Windows. Some of the new changes include showing a total percent usage at the top of your Processes, which makes it easier to determine total memory and CPU usage, improved Performance graphs, a Startup tab to see startup processes and their impact to system performance, and the App history tab (as shown below) that gives you the total resources an app has used over a period of time. Press Ctrl + Shift + Esc to start exploring the new Task Manager.
Windows 8 Task Manager
Use a picture password to log into your computer
Windows 8 includes a new feature called Picture password, which allows you to authenticate with the computer using a series of gestures that include circles, straight lines, and taps. Enable this feature if you want a new way to access your computer or have a hard time with passwords.
  1. Open the Windows Charms.
  2. Click Settings and then More PC settings
  3. In the PC settings window click Users and then select Create a picture password
Bonus tip: A four digit pin password can also be created and used to access your computer.
Take advantage of Windows 8 apps
Windows 8 comes included with several apps to help you get the most from your computer. Below are just a few of the included apps.
People
Microsoft touts the People feature in Windows 8 because they understand how many people are using social networks today. In the People feature you'll be able to connect your Windows computer to all the major social networks including Facebook,LinkedIn, and Twitter. Once connected, you can pin the people app and monitor your social network (as shown below), use People in Search to find people, and get an overview of what is happening in all your social networks.
Windows 8 People
Reader
The Reader app will give you PDF support right out of the box.
SkyDrive
The SkyDrive app will give you access to the Microsoft cloud service SkyDrive, which allows you to store your photos, documents, and other files in the cloud and access or share those files with any computer with Internet access.
Store
Take advantage of the Windows Store and install one or more of the thousands of available apps designed for Windows 8. The Store is found in the Start screen, or use Search to search the Store app for any apps that you are trying to find.
Know the answers to common questions
Windows 8 is the biggest change to Microsoft Windows since the introduction of Windows 95, which was released all the way back in 1995. Since so many people have grown up with Windows, it can be difficult to transition to a new way of doing things. Below, is a short list of the most common questions previous Windows users will have.


Thursday, 11 April 2013

How to Create Short URLs For Your Blog Using Google Shortener


With the rise in the social media, we are continuously seeing people are giving more significance to branding. The branding starts from the Facebook Cover, personalized twitter background, but that’s not all. While sharing anything on their social profile most of the top companies always prefer small URLs instead of Long Tail URLs. For example,BuySellads uses “bsa.ly”. If your site is hosted at Blogger.com, then we have good news for you. To get a slim small URL for your content, there is no need to rely on a Third-party URL shorting services. Fortunately, Google provides a Free-to-use URL shorting service that does the job quite brilliantly. Therefore, today in this article, we will Show How to Create Short URLs for your Blogger.com Blog Posts?

Why to use the Google URL Shortener?

People often share lots of links online. With character limits in tweets, you do not get enough room to say what’s in your mind. In this situation, Small URLs provides you the room to express your thoughts within the same Status update or tweet. Following are the few perks of this service. 

  • Stability: One of the most reliable services with almost 100% uptime.
  • Speed: With high speed Google server, it loads URLS quicker than anyone service (in a few milliseconds).
  • Security: Sends warning and notifications if URL points to Malware or phishing or spam website.
  • Analytics: Not only tracks the number of Clicks on your link but also provide the geographical details or the user.

How to Create Short URLs with Google URL Shortener?

First go to http://goo.gl and Login into your Gmail Account, which will allow you to track the number of clicks that you are getting on a certain URL. Once done, proceed to the next step.
Now just enter the Post URL or any other URL in the address bar (input box) at the top of the page and press the “Shorten URL” button. On pressing the blue “Shorten URL” button, a new window will slide out, and it will provide you a short URL somewhat like goo.gl/QoSaR. Consider the following screenshot.
Your short URL is ready, and it can be used on any social platforms i.e. Twitter, Facebook, and etc. to test whether the URL is working well or not, copy that Small URL and paste it into the address bar of your browser and Hit enter. On pressing enter, you will notice that Short URL will automatically redirect you to the Long URL that you just shorten few moments a go.

Frequently Asked Questions:


How to Track Number of Clicks or Visits?
To track the number of visits, you first have to login into your Gmail account which you used while creating a small URL. After logging in, go to goo.gl and on the bottom of the page you will notice all the Long URLS which you shorten through Google URL Shortener. From the list, select any Long URL which you want to Track and Press “Details” to get access to the comprehensive tracking Report. It will not only Display the number of visitors but would also provide their other details i.e. Browser, Referring URL, country and operating system.

How many Short URLs I can Create?
You can generate unlimited Small URLs using Google URL Shortener service. There is no limitation in this free-to-use service. 

Monday, 8 April 2013

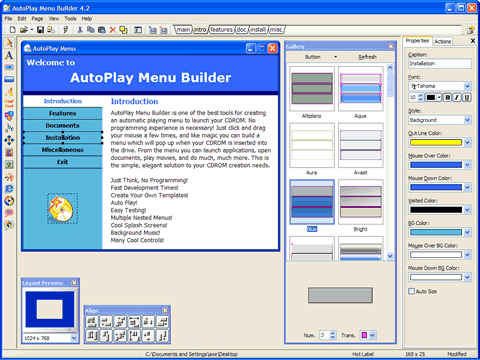
Autoplay menu builder v6.02

AutoPlay Menu Builder is one of the best tools for creating an automatic playing menu to launch your cd or dvd. No programming experience is necessary! Just click and drag your mouse a few times, and like magic you can build a menu which will pop up when your disc is inserted into the drive. From the menu you can launch applications, open documents, play movies, and do much, much more. This is the simple, elegant solution to your disc creation needs.

Features
  • Just thinking, no programming.
  • Powerful WYSIWYG designer
  • Full Unicode support
  • Create stand-alone executable files and customize the icon of executables
  • Test menus easily without building
  • Protect menus from being modified by others with password
  • Support full screen window and irregular shaped window
  • Create menus with multiple pages
  • Show splash screen and end screen
  • Many kinds of control and action
  • Support BMP, PNG, JPG, GIF (even animated), PCX, WMF, EMF, ICO images
  • Support MP3, MP2, MP1, OGG, WAV, MID, RMI, XM, IT, MOD, S3M files for background music
  • Support tooltips and text/graphic comments
  • Built-in slide show support with a large set of effects
  • Built-in music player with Winamp 2 skin support
  • Embed Flash, Internet Explorer, Windows Media Player and Adobe Reader in menus
  • Install fonts before loading menus
System Requirement
  • Operation System: All 32-bits and 64-bits Windows
  • Hard Disk: 35 MB for installation
  • Processor: Intel Pentium 166 MHz or above
  • Memory: 32 MB RAM or above
Screenshot

facebook like

Receive all updates via Facebook. Just Click the Like Button Below...